Optimal guiding
Auto-guiding is always a trade-off between correcting for any setup mechanical errors, long or short term, as well as atmospheric refraction and seeing inducted tracking error. Short guider exposure values may correct mount tracking short term errors (gearbox noise, ...) but under seeing limited conditions those will be susceptible to seeing.
For instance more than 80% of seeing error variance for a given guide star is coming from the tilt/tip of its wavefront, the star jumping around. Higher order aberrations may still exist but there are not dominant. In the context of atmospheric seeing the guide star seeing is seldom correlated with any target star near by. Such correlation only exists inside a very narrow patch, known as the iso-kinetic angle, for the tilt/tip effect (star jumping around). Such patch is usually less than one arc-second across in the visible band.
This means that correcting the mount (or using an AO) due to seeing is only valid for the guide star at the expense of the all imager FOV, if larger than about one arc-minute or so. Since longer guider exposures integrate the seeing its auto-guiding unwelcome contribution is reduced when using longer guider exposure values. Of course to long exposure may not be able to correct some aspect of the mechanical errors anymore.
There are optimal sets of auto-guiding exposure and aggressiveness values for minimizing the FWHM of a give target star away from the guide star making the all image frame as sharp as possible.
SkyGuide provides a tool for computing those optimal values.
Also since SkyGuide can use more than a guide star (if more astronomical pattern is present in the guider FOV) the seeing induced tracking effect will be reduced accordingly.
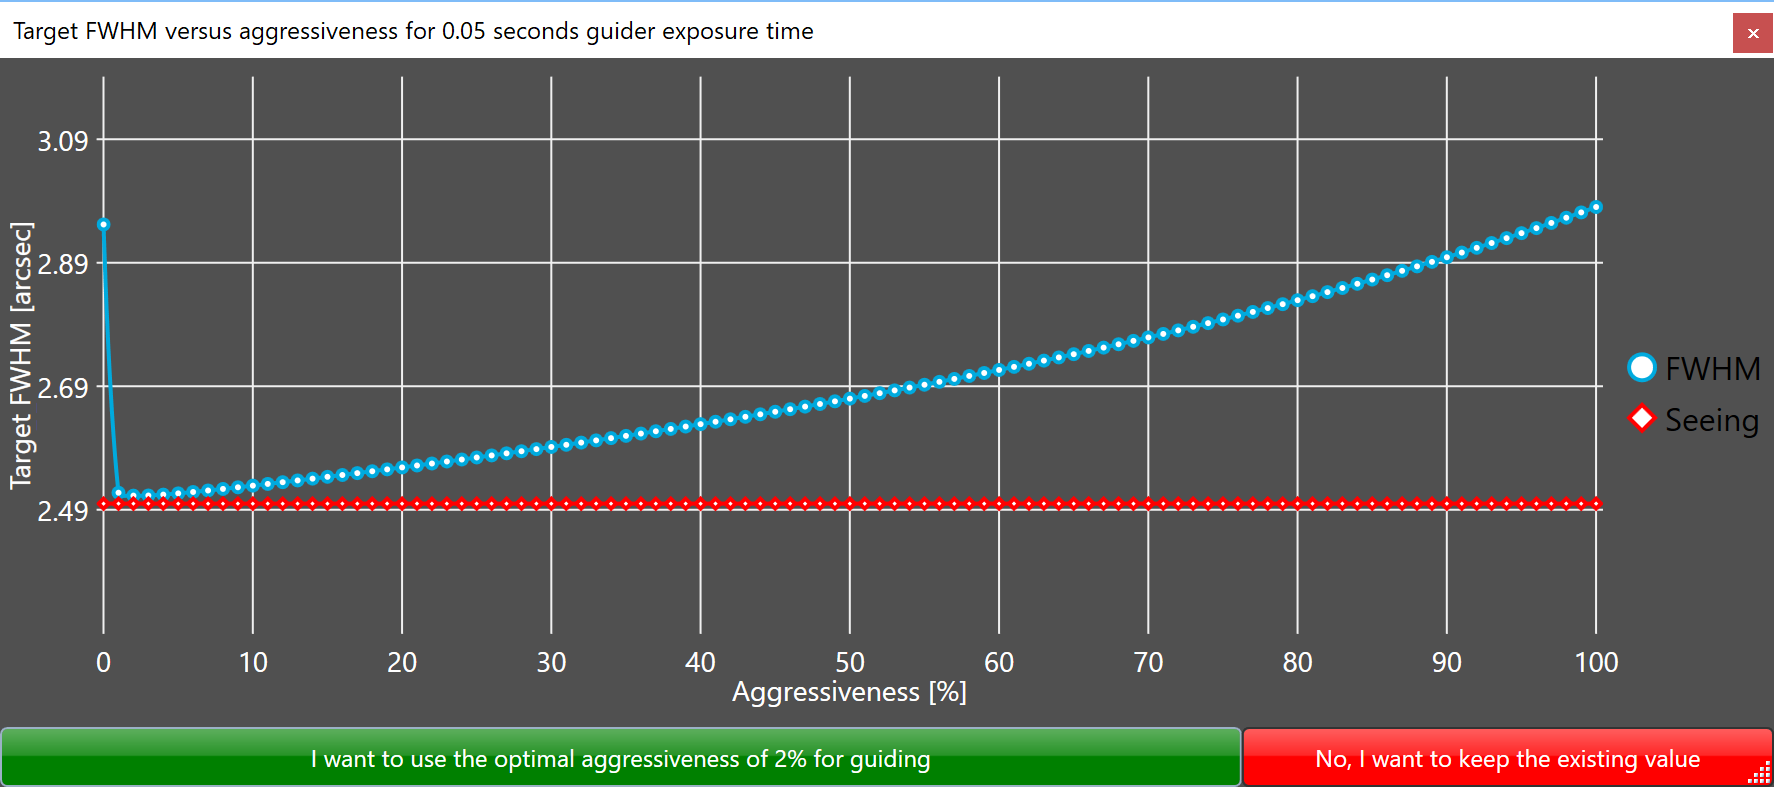
The red curve represents the local seeing condition.
The blue curve represents the target FWHM that can be expected for each aggressiveness value.
The calculator automatically selects the optimal aggressiveness percentage. Optimal aggressiveness corresponds to the aggressiveness releated to the predicated minimum target FWHM.
To select save the optimal aggressiveness, click the green button. To keep the existing value, click the red one.
 As the optimal aggressiveness may not the same for both axis, use the calculator individually on each axis.
 In most cases we do not recommend using aggressiveness values above 50%. Also one should consider using the longest guider exposure time one can afford for a given setup before being drift limited. This insures a maximum seeing induced tracking immunity.
One figure of merit for evaluating the effect of a given setting (exposure time and aggressiveness) is the error reduction between the auto-guiding and tracking errors..